March 27, 2020

Wk 5 Studio Activities (continued) - Fusion 360 "2.5d Shapes and Assembles" Task

The transition space I chose to model was the stairwell and hall of my house which leads to my bedroom (as well as other rooms).


Fig. 1

Fig. 2

The process
- Fig 1 displays path of hallway
- Fig 2 shows process of closing hall (ceiling)

____________________________________________________


The result - finished model!
Fig. 3 - back view

Fig. 4 - front overview

Fig. 5 - front overview

Fig. 6 - model slice open to reveal interior


Explanation:
The model is a representation of the hallway of my home, which spans in an L-shape (see figures 1 and 2). There is one main 'hallway' window (the rest of the windows are part of the rooms connected to the hallway) -which I showed by cutting open the model in fig. 6. Leading to the hall are some stairs which span in an L-shape as well. Notice in fig. 4 that the stair seems 'full' - but in fig. 5, you can see there is an open space. This is due to the fact that there is a storage room under the staircase - an open room. Also, the gap in the top - as shown in all models, is a skylight which lets in a lot of natural light into a direct part of the hall. The steepness of the L-shaped stair is the steepness of my staircase itself.


Fig. 7 - pieces laid out flat


Fig. 8 - screenshot of model transferred to A.I. ready for laser cutting

Fig. 9 - pieces on Fusion 360 Drawing Sheet. Scale is 1:2 (this allowed pieces to fit on sheet)


March 24, 2020

Wk 5 Studio Activities

For this week I was required to construct a 3d model of my room where I work, thinking of space. I decided to construct a room at scale, in a literal form, then gradually go towards abstract form, as shown by the decreasing literalness of the models below.


Model 1: Original, to scale 1:10 of room
Views of my workspace/room. See bed, side desk, work desk, cupboard and surrounding walls

The first model I took very literally. I constructed the room to a scale of 1:10; with my room being approximately 2m by 2m - a tight room with little space. Above are different angled views of the model showing a rather simple layout in a small space.


Model 2: Original with adjustments, deviation from scale

With the second model, I made it so that there was the essence of abstractness. I also added some material - see cardboard representing blinds on windows. Ideas of each 'object' are shown - the cardboard blinds in the top left suggest blockage, the X-formations suggest new ideas being produced - this is the area of my work desk. The scale of the physical objects (bed, side desk and window) is still 1:10. 


Model 3: Abstract form added, emphasis on space rather than scale

Instead of its literal form and scale, I instead focused on what each component of my room suggested. Hence, the wavy, gentle pattern on top of the bed stresses relaxation and tranquillity. The space at the desk contains V-shaped pleats which suggest new ideas being formed (see how it is pointing upwards). The blinds remained the same, and the cupboard also having the V-shaped pleats suggests that it is dynamic and always growing. In future models, these components will become the basis of new rooms. 


Model 4: New rooms added, scale exaggerated, emphasis on space

Due to the small size of my room, I emphasised restriction and tightness. Hence, 'confine' was a base word for the construction of this model. I added new rooms to upgrade my workspace. There is a semi-literal, semi-abstract essence to this model. At the front, the double doors open up to a very small, confined space with objects and components smuggled together. To the left, the wall seems to collapse and warp inwards. The room with the orange is the bedroom - see the bottom right image, with the abstract waves suggesting tranquillity and relaxation, the white V-pleats on tracing paper suggesting ideas at the desk. The room with an arch opens out to a bigger, better workspace.


Model 5: Final model - combined abstract form and literal form, added rooms and workspaces

As seen from above, the progress enabled me to produce this final, conceptual model.


Overview of room, expanded

You can see how there is an increased literalness to this model, as from the abstract models and other models from previous attempts. The space opens and expands into a tightly compacted place.The closest door leads to the bedroom (orange) and lower workspace area. Stairs lead to the main work area (see upper room). The notion of what each room suggests is prevalent. Note the emphasis on tightness and restriction.


Top view


Detail of connecting rooms. Workspace is in background


Main workspace on a raised level. Middle cardboard is a corrugated wall dividing room into two sections. Notice hole with V-pleat - this will be stairs leading from the lower floor (ground level)


Stairs leading up from ground floor to main workspace. Note space below


March 14, 2020

Composite Image

My idea for the composite image was to show a half metaphorical half literal timeline on how our work over the weeks progressed and would be able to lead us to complete the project.

I decided I would start with basic sketches of the area, on grayscale, then gradually blend it into colours and photos to show the end product through a timeline. This idea was later amended by group members where we used filters to improve the looks of the sketches and transformed it into watercolour. This would show uncertainty and vagueness due to the unbold lines.


March 11, 2020

Orthographic of Area

My group members and I were able to come up with the following orthographic, made on Adobe Illustrator, using our chosen colour palette.


March 8, 2020

Wk 3 Studio Activities

In class, I was required to do a series of orthographic drawings.


[Yet to Upload A3 Scans]

March 4, 2020

The infographic -- the result!

Me and my group members were able to collaborate to produce this final infographic.

My part for transport was changed slightly to fit in with the other fonts and styles. See the WEATHER section with the sun and the UNSW image below - my section for TRANSPORT are the modes of transport travelling towards the university!


The infographic - transport section

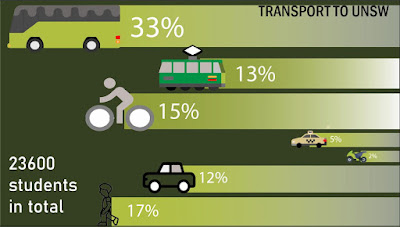
My chosen infographic section was 'transport' - below is the section I made.


Brief explanation:
- Infographic is showing methods of transport to UNSW and how many people go by each transport type (i.e. bus, light rail, etc.)
- The longer the line and the bigger the image; the more people are travelling by that mode of transport (e.g. bus has the biggest image and line - has the most people travelling by it)

The lines are supposed to also represent the path/road to UNSW - all vehicles are travelling to the university. In the centre, my group member and I have put an image of the university (SEE ABOVE POST). Hence, this section leaning from the most right means the journey is starting from the right but is travelling to the centre (the university).

March 2, 2020

Wk 2 continued: Components in the Built Environment

The following are examples of deliberately used Design Elements and Principles on my site.


We were also asked to photograph 20 examples of Built Environment specific words associated to our site. My chosen 4 are as follows -


March 1, 2020

Wk 2 Studio Activities

My chosen data set was transport - below are the three words and their colour swatches.


Infrastructure


Contemporary


Communal


Final Overall Colour Palette Choice: